There may be changes you'd like to make to the email templates available. Click here for an overview of each template available. The email templates use liquid syntax for editing.
How to edit an email template:
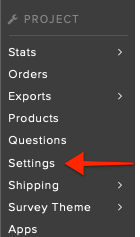
1) Access settings.
Found on the left menu.

2) Access email settings.
A submenu to Settings found on the left menu.

3) Edit the template.
1. Click the three dots to the far right of the template you want to edit. 2. Click 'Edit'.

4) Create new template (if needed).
If you do not see a template you'd like to use, simply create a new template by clicking the green "Create Template" button in the top right corner.

5) Add liquid variables and tags.
On the far right side of the editing window, you'll see the Liquid Variables and Tags. Variables will display values from the system, related specifically to the project and the order. The email that backers will see will have project and backer specific data in the variable fields. Example: Great news! Your order for {{project.name}} has shipped!

Tags apply specific formatting to a segment of text within the email. Begin the formatting with the tag {% bold %} at the start of the text. Be sure to end the formatting by entering "end" to the tag {% endbold %} and put it at the end of the formatted text. Adding "end" (with no spaces) to the tag will tell the system to stop the formatting action. This is most commonly used to format a line of text. Example: {% bold %}{{project.name}} Team{% endbold %}

Filters combine a variable with a formatting tag. This is most commonly used when you want to format only one or two words. Simply replace the word "variable" with the actual variable "project.support_email" to assign the action. Example: If you have any questions please reach out to our support team. {{project.support_email | italics}}

6) Preview the email.
Once you've made the necessary adjustments, you can preview the email (as the backer would see it) before saving your changes. 1. The "Preview" button is found in the top right corner of the window. Click the down-pointed arrow to access more preview options. 2. To see the details as a specific backer, enter the order number and click the right pointed arrow. 3. Clicking "Send Test Email" will send a copy of the email to your email. Without a specific order associated, the details would be generic.

7) Save Template.
To save your changes, click the green 'Save Template' button in the top right corner.

Commonly used text segments:
Shipment Tracking: Add Tracking Number
{% if order.locked.ship.tracking_number %}
Your tracking number is: {{order.locked.ship.tracking_number}}
{% endif %}
Shipment Tracking: Add Shipping Method (carrier name OR carrier URL)
{% if order.locked.ship.shipping_method %}
You can track it at: {{order.locked.ship.shipping_method}}.
{% endif %}

